
 June 1, 2019

Have you ever watched a home improvement show or video and thought, “Well, even I could do that!” Two psychologists at the University of Chicago hypothesized that people overestimate how much their abilities improve after extensively watching others perform. They found people built a false illusion of competency after merely watching someone else perform a task.
My own reaction when watching shows like the venerable This Old House or seeing Chip and Joanna Gaines transform houses in Waco is, “That is harder than it looks.” I have never been tempted to tear down walls in my house, replace gypsum board, or the like. I would prefer to pay others who do such things for a living handle them with confidence and competency. When the tile walls around one of the bathtubs at Meador Manor was collapsing in 2007, I was relieved that the guys from The Quarry in Dewey were willing to install new greenboard on the studs to anchor the new acrylic resin walls. But I had to remove the old tile and decayed gypsum board myself.


I had to screw up my courage to tear away the lower decayed portions of the failing shower walls and buy a small reciprocating saw to free the upper sections. I managed to chip the edge of the porcelain bathtub in one spot, but overall it went well. I still happily dry off the sleek panels after each shower, thinking to myself, “I will never scrub tile grout again!”
When I purchased the house in 1994, I disliked the original 1981 wallpaper in that bathroom. Yet in 2019 it is still there, since I know my limits: hanging wallpaper is something I will never tackle. I am certain it would turn out a bit crooked or have small bubbles or curls or cutting errors which would drive me crazy. Installing a self-stick border around a window is the most I’ll tackle before calling in professionals.
The Shed Deck

The shed John and Betty Henderson provided and built for us
I’m no carpenter, so I was truly grateful when Betty and John Henderson not only purchased a Lifetime high-density polyethylene shed I had picked out at Costco for a wedding present, but John built a platform floor and assembled the shed while Wendy and I were on our honeymoon in July 2016. Three years later, it is in perfect condition and the happy home for our yard equipment and tools.
When Wendy and I were in the yard a few weeks ago, she remarked how she would like to sit on the north side of the shed, shielded from the neighbors, and enjoy the view of our next-door-neighbor’s backyard plantings and her own roses. I decided a little deck tucked against the shed would be just the thing for that, with a wood screen to give her greater privacy. I wasn’t about to craft anything myself out of wood, however. I figured there must be some sort of small deck kit I could assemble and a prefabricated wood screen I would plunk down.
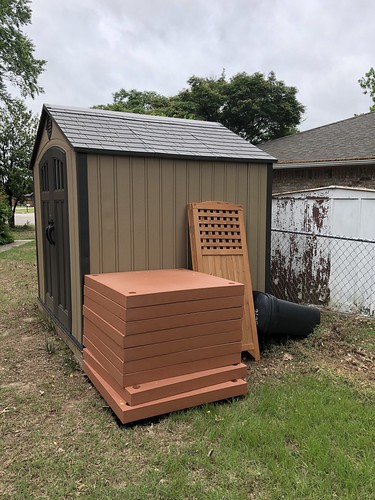
Surface panels and screen beside the shed
I found various deck kit systems and read the reviews, finally settling on a very pricey UDECX kit from a small firm in Ohio, which I ordered for home delivery from Home Depot. I was reassured in taking on the project by their component and installation video.
So I ordered a kit on April 8 and Home Depot said it would arrive by April 21. But then it was back-ordered, and the lift truck didn’t show up with it until May 16. The deliveryman deposited the 460 pound kit on a pallet on our front walkway.
Wendy helped me unpack the kit, and we stacked the polypropylene piers on the patio and stacked the 9 40″ square polypropylene surface pads by the shed. They sat beside a folding wood screen I ordered from Wayfair. Its four 2-feet-wide by 5-feet-high sections would fit nicely on the edge of two surface pads. I positioned the structural piers on the ground beside the shed using a cardboard positioning template in the kit. The ground falls away to the north and west toward our neighbors, so I had to use the 1-inch plastic shims and 3-inch risers to level out the pads I positioned atop the piers and cam-locked into place.

I used 5 of our 9 panels
I used five of the nine panels in the kit to form the shed deck. The stump of an old volunteer tree prevented me from placing a panel in one corner by the shed, and I figured Wendy might like to plant something there someday. I used the remaining shims and risers to place one more surface panel beside a rose planter of concrete blocks which Wendy built earlier this spring.
Of course the fierce winds we get meant we would have to somehow anchor the wood screen along the east side of the deck. Wendy cleverly suggested we use a spare bed head frame stored in the garage rather than purchasing an expensive UDECX railing kit. So I pounded the legs of the frame into the ground and tied the screen to it. Wendy propped it up with a patio chair while we endured a week of thunderstorms in late May which led to the highest flood in town since 2007 and the first indoor commencement for the high school in 25 years. Once that exhausting week of wild weather subsided, I pounded a stake into the ground to help anchor the railing. Eventually I’ll use wire to replace the ugly orange string tying it to the screen.

The new furniture for the shed deck
Both of our patio chairs, Wilson & Fisher sling chairs we picked out at Big Lots a few years ago, had been damaged by squirrels or cats ripping through the fabric seat. So I wanted something different for Wendy’s shed deck. I opted to purchase two Devoko wicker chairs and a matching glass-topped table made of synthetic polyethylene rattan. They were delivered during the wild weather week. Wendy said it perfectly illustrated our different personalities that while we were under a tornado watch she was busily checking and preparing our interior closet refuge while I happily sat on the living room floor, laboriously screwing together the new patio furniture.

Our new shed deck
Decking Out the Patio
Now that we had a cute little shed deck, the pressure was on to do something about the concrete patio. It had some big long cracks when I purchased the place in 1994, and over the years I had filled them a couple of times with urethane caulking. But over time the caulking had split, allowing the freeze-thaw cycle to exacerbate the separation and settling of the concrete slab segments on the clay-rich soil. Multiple earthquakes this past decade which were induced by wastewater injection wells hadn’t helped, either.

Wood patio pavers
So the cracks were now up to an inch wide, with grass growing up through some of them. My success with the UDECX kit led me to look into what I might cover the patio with to improve its appearance. Wood patio tiles or pavers, stapled atop interlocking plastic backing grids, were simple enough I could handle them. Having spent plenty on the UDECX kit, I budget-shopped and fixed on fir wood tiles by Yaheetech, purchasing 216 one-foot-square tiles.
They sat in their boxes in the living room while I pondered what to do about the cracks. All but one of the cracks was now far too wide for caulking, which had not held up anyway. It was time for YouTube!
I watched a bunch of different videos of folks repairing various types of cracks in sidewalks and driveways. Our patio had only one long crack that was shallow and narrow enough for concrete crack sealer to work. The rest would need actual concrete patches, but even at age 52 I had never mixed any concrete before. (I know, I know; I can’t drive a stick shift, either.) So I watched videos on that as well, finally deciding that I would buy a 60 pound bag of Quikrete Sand/Topping Mix. At Lowe’s I bought the mix, a bucket, a mixing tub, nitrile gloves, bonding adhesive, a brush, and a couple of trowels. I think one is called a mason’s trowel and the other a square trowel, but to me they were pointy and flat.

Cleaning the cracks
On the Saturday of Memorial Day weekend, I put the garden hose nozzle on its tightest stream and washed out the cracks in the patio, pulling out the old caulking. Almost all of the cracks were filled with dirt and teeming with worms which were rather upset by my rough treatment. I cleaned the cracks out as deep as I could. Sunday was rainy, but on Memorial Day I was able to mow and edge the yard and sweep the patio.
Then I used a heavy rake to mix the sand/topping mix with water in the tub. I painted a crack with the bonding adhesive in hopes it might help the new concrete bond with the old, then used the pointy trowel to fill it with concrete. I then used the flat trowel and brush to smooth out the top. One by one, all the cracks were filled.


The bricks of Meador Manor spall wherever water regularly contacts them. Much of the chimney façade has spalled away, revealing the red interiors of the bricks, with the same happening to all of the lowest bricks around the perimeter of the house. The bottom east corner of the chimney had deteriorated to where you could see the mortar down in the brick holes. So, in addition to the sand/topping mix, I had purchased 20 pounds of mortar repair mix. I mixed that up in my bucket and applied it liberally to the lower courses of bricks on the corner of the chimney, plumping the area up. I used the pointy trowel to cut grooves in the mortar to mimic the mortar patterns of the surrounding bricks. Given the spalling surface of the chimney and how our patio bench would obscure the area, I didn’t bother trying to tint the mortar repair concrete.


Then I applied concrete crack sealant to a lone shallow crack and began laying down the wood tiles. I kept them several inches from the edges of the patio so that I would avoid damaging them when edging. It took 18 tiles to cross the length of the patio, and I steadily laid them down. It was hot work, and on one of my cool-down rests in the manor Wendy wet a dish towel and wiped off my face and scalp, draping the cool towel over my head and providing me with Gatorade.
With renewed vigor, I finished tiling the patio and shifted the furniture back in position. Waterproof pillows that had come with the rattan chairs for the shed deck were repurposed to make the older ripped patio chairs usable again. I raised the shade umbrella and admired the rejuvenated patio.

Rejuvenated patio
It was fun to create a new seating area in a side yard and spruce up our patio. There are still various home improvement projects to eventually undertake, but this summer will be packed with a 12-day vacation out west, followed by a week-long conference in Philadelphia, plus plenty of Chromebook deployments and distributions along with configuration and interconnections of many online services for students and staff in the school district. I am glad I finished up these projects before June.


