Mac Day 4: Mostly Cloudy

A primary reason I am comfortable shifting to a Mac at home after 40 years of using Windows is that so much of my computing is now done online. The primary exceptions are photo/graphics and video editing. Let’s take a look at how my use of productivity applications has evolved.

Word Processing

My first experiences with word processors were in the 1980s with Scripsit and Telewriter-64 on my primitive TRS-80 Color Computer. Later I used Digital Research GEM on the more advanced Tandy Model 2000, one of the very few personal computers that used the 80186 microprocessor.

The first professional word processor I used was a dedicated Wang terminal when I worked at the Oklahoma State Department of Tourism in the summer of 1985. It was next to a noisy 10-megabyte hard drive that was about the size of a washing machine.

The first professional word processor I used was a dedicated Wang unit

A year later, I started working for Scholars Programs at the University of Oklahoma, where I learned WordPerfect 4.2 for DOS on a personal computer, which was a relief to use compared to the venerable Wang. I had Multimate for my Tandy Model 2000 at home, which was reminiscent of the Wang in its features and interface. I also experimented with WordStar, Microsoft Write, and Lotus Symphony. But learning WordPerfect at work led me to get it for my Tandy 2000, and I would end up using WordPerfect continuously for about 30 years.

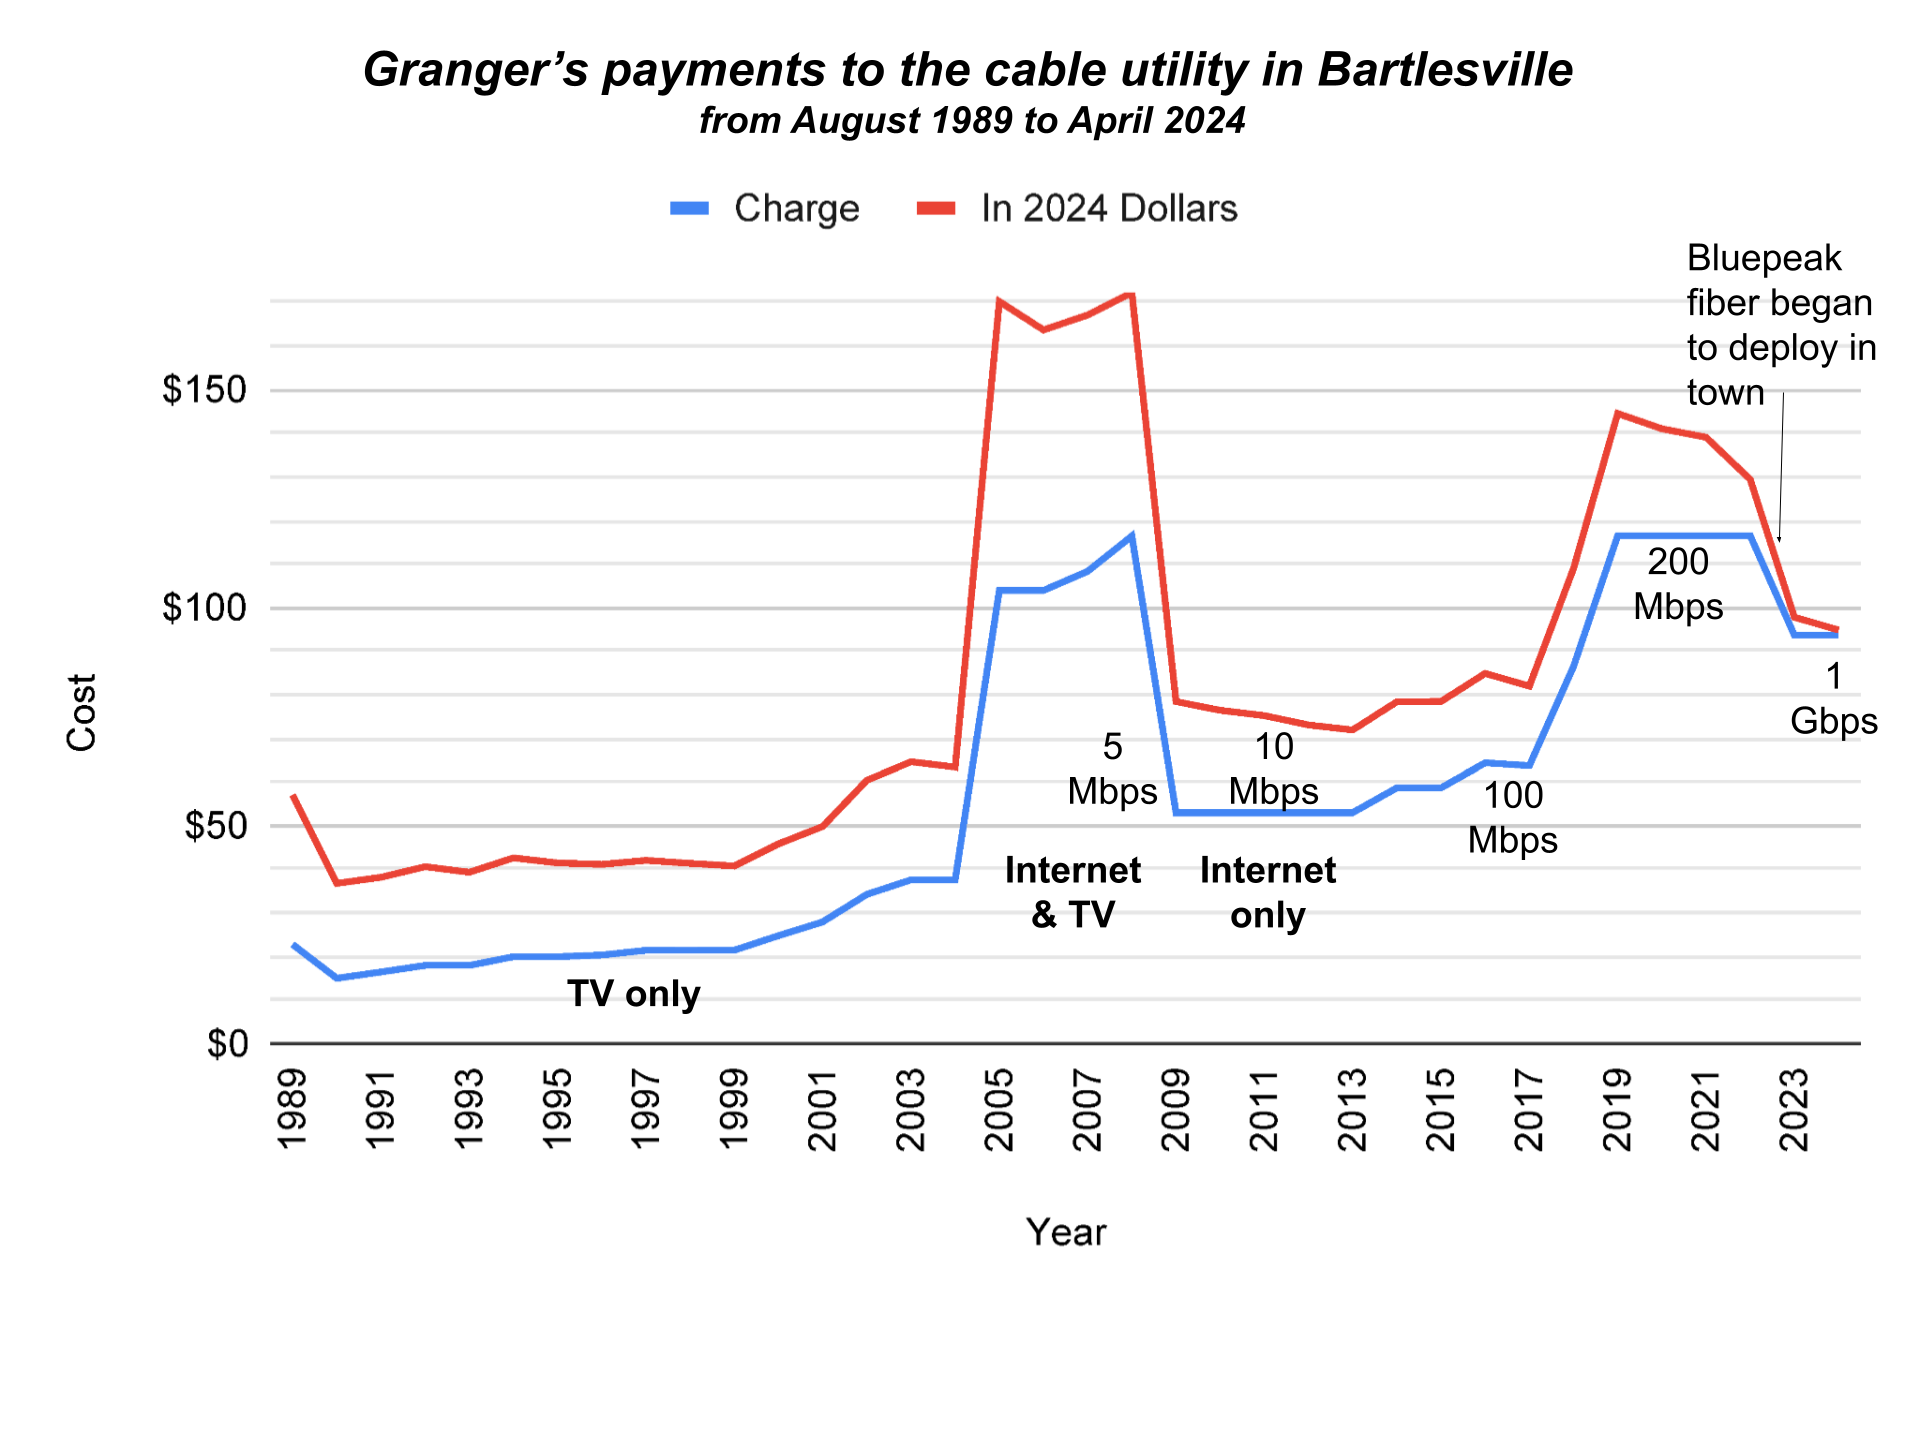
After coming to Bartlesville in 1989, I eventually had to learn Word to collaborate with some coworkers, but I never liked Microsoft’s word processor, preferring the tighter and far less confusing control that WordPerfect offered. It used embedded codes for functions that you could make visible for precise control, while Word, particularly in the old days, was far more opaque. But Word gradually overtook and then marginalized the superior product. Thus, back when I sold a physics curriculum, I made sure to include editable versions of the student handouts in the Word format along with their true master versions in WordPerfect. I steadily updated WordPerfect until version X7 in 2014, which was the 13th update of the software I used.

My career shifted in 2017 as I went into administration. I was recruited to lead the district’s technology and communications efforts, and a big focus was on deploying Chromebooks for students and teachers. So I made a point of using Google Docs, Sheets, and Slides instead of WordPerfect, Quattro Pro, or Presentations in the Corel WordPerfect Office suite or Word, Excel, and PowerPoint in the far more popular Microsoft Office suite.

For the past seven years, the only time I’ve used Microsoft Word instead of Google Docs has been when editing a document someone else created or for complex tasks like a mail merge, which is still beyond the capability of the free online version of Word and requires the desktop-based application. So while I have oodles of legacy documents in old formats, Google Docs is all I need at home for word processing. Since Apple Pages is free for Apple users, I could also play around with it, but for convenience I plan to just use Google Docs.

I no longer have much use for Desktop Publishing applications, but back in the day I used CorelDRAW, The Print Shop, and Microsoft Publisher. I also did a few small jobs with Adobe InDesign and QuarkXPress. The only desktop publishing service I’ve used recently was the online Canva, when I was testing it out to decide if we would set up Canva cloud licenses for the school district.

Spreadsheet

Lotus Symphony for the Tandy 2000 was NOT cheap!

My first spreadsheet was Lotus 1-2-3, which we used occasionally when I worked at the University of Oklahoma in the late 1980s. The “1-2-3” in the name referred to how Lotus was originally billed as an integrated product with spreadsheet, database, and graphing functions. I bought Lotus Symphony for my Tandy Model 2000 at home, which added a word processor and a communications program, but the spreadsheet was the main attraction. Symphony cost the equivalent of $2,000 in 2024 dollars…business software was expensive back then.

I gradually started using Microsoft Excel in the 1990s, and I gained the most experience with it once I started doing the numbers for the teachers’ bargaining team. When I became the Chief Negotiator for the team, I also served on the superintendent’s budget committee. I built complicated salary analyses, picking up a few Excel tips from the district’s directors of finance.

I also learned how to load the Analysis ToolPak in Excel to perform various statistical analyses so that I could show students how to test their science fair project data for statistical significance. I learned statistics beyond the basic concepts of mean, median, mode, and standard deviation in graduate school, where we did the various types of t-tests, Chi-Square, z-tests, ANOVA, and non parametric ones like the Mann-Whitney U Test and the Wilcoxon signed rank test.

Excel has a great add-in for statistical analysis

However, most of my spreadsheet work is now in Google Sheets. I used it extensively for tracking data and creating charts throughout the COVID pandemic in my role of chairing the school district’s Pandemic Response Committee. I seldom find I need Excel over Sheets, although since it is installed on my Windows systems at work and at home, spreadsheets automatically open in Excel, so when I use Sheets it is mostly files I created myself; I rely on dozens of them in my job.

Presentations

WordPerfect released the MS-DOS drawing program DrawPerfect in 1990. It became WordPerfect Presentations and added slide functionality. I used Presentations for some detailed graphics work from 1993 to 2020, but I never used its slides capabilities. Nowadays I do most such work in Google Draw. Although I use Adobe Illustrator for some graphics, such as district logos, I know very little of its functionality, and most of my graphics work is vector-based drawings, not bitmapped paint stuff.

A slide from one of the PowerPoints I created for my physics classes

For slides, I of course used Microsoft PowerPoint, although it could really frustrate me when it came to sound. PowerPoint was very bad about allowing one to incorporate a video or music, but then the sound not working when you exported a file to take it on the road. It was so bad that I sometimes would convert a presentation into a video file that I would manually pause to ensure the sound worked.

I enjoyed grumpy Edward R. Tufte’s The Cognitive Style of PowerPoint: Pitching Out Corrupts Within, which was useful in avoiding the worst PowerPoint faux pas, although once you read the book, you’ll truly suffer in many meetings.

Since 2017, I have always used Google Slides instead of PowerPoint, although I have also created online interactive presentations with Prezi and Pear Deck.

Databases

dbase III

The first database I used was dBase III. I was working in Scholars Programs at OU where my boss had paid a student to write a scholarship database for them. That student had graduated, and I got the thankless job of trying to update its programming, having never seen a database before. Thankfully I knew a tiny bit about fields and records from learning the BASIC computer programming language at home and in high school.

We survived the experience, but I was glad when my boss got the funding to pay the university’s COBOL programmers to create a new database on the university mainframe. That was far more powerful, but my boss was angry about the revision costs. He would complain, “If I need to have just one @#$ing letter changed on a screen, I get a bill for hundreds of dollars!”

So when he needed a health fee waiver database which scholarship recipients could access, he paid me to write it in BASIC one summer. I subcontracted my friend Jeff Silver, who was doing database work for a living at company that made trucking logistics software, to help me with the roughest parts. The health fee waiver database was set up and running on a personal computer in the university library for a few years. It was cheaper to pay me to write a database from scratch and buy a computer and monitor to run it on than to pay to build the database on the university mainframe, and that was too long ago to simply have the database on the internet for students to access.

Almost a decade later, the Y2K crisis was in the news because lots of old software used two digits for the year, and the year 2000 meant old programs like that would malfunction. I remember thinking that my health fee waiver database was definitely not ready for the new century. Thankfully, it was of course long gone by then.

I generally found I could handle most of my data storage and manipulation needs using a spreadsheet, although in the 1990s when Bartlesville High School hosted a state Student Council convention, we had to track housing for hundreds of students across dozens of households across town. My former student council co-sponsor roped me into helping by creating a housing database. I either used FileMaker Pro or FoxPro for that, but I can’t readily recall using a desktop database application after that.

Nowadays at work I access multiple online databases on a regular basis, but I have no other need for them.

Getting the Picture

So you can see that I now do most of my work in the cloud. Hence I hope to avoid installing Microsoft Office on my Mac, and if all goes well I plan to not renew my $100 Microsoft 365 Family annual subscription at the end of June.

However, I have 340 GB of photographs on OneDrive, which is the online backup of over 130,000 of my photos that I also have on my Windows PC. There will be more on the photos situation in a coming post.

Meanwhile, happy computing!

Posted in Mac, technology | Tagged | Leave a comment

Mac Day 3: Keyboard Travails

This is from day three of my switching from 40 years of using Windows at home to a Mac Mini. In my previous post, I shared my first day’s progress, in which I updated the Mac Mini’s macOS from Big Sur 11.2.2 to Sonoma 14.4.1. I then figured out the keyboard, learned how to snap windows to the sides of the screen, and discovered how to take screenshots.

Let the spending begin

Theoretically, switching to the Mac Mini would save me money by allowing me to avoid buying a new Windows 11 desktop computer once Windows 10 support ends in October 2025. I knew the reality was that I would be spending at least some money on hardware, software, and more to make the transition work for me.

The first spend was a mere $5 for the Magnet app, since the default way to snap windows was too cumbersome for my taste. Now I can just drag a window past the edge or a corner of the screen to snap it into half or one-quarter of the screen, etc.

The second spend was $11 for a dongle so I could read SD and microSD cards on my Mac, since despite my general reliance on my iPhone, I want the capability to directly load any photos onto my Mac that I take with my Canon EOS Rebel T6. I already had a few USB SD card reader dongles, but they were all USB-A. My Mac Mini has a couple of high-speed Thunderbolt 3/USB-C type 4 ports, and I wanted to be able to use those.

The third spend is the focus of this post: $120 for a Logitech MX Keys S keyboard. I bought an iClever IC-GK03 keyboard and mouse in 2021 for the Mac Mini, and that had only set me back $27. But I found that if I turned off the keyboard, I had to remember to hit fn+Q to put it back in Mac mode, and I didn’t like the half-size up and down arrow keys. I have also been annoyed at having shuffle between the wired keyboard on my Windows computer and the iClever one for the Mac on my cramped desktop.

I read several reviews, and settled on trying a fancy Logitech MX Keys S keyboard that I could connect to the Mac via Bluetooth and to my PC with a dongle.

A Grumpy Old Man and His Logitech MX Keys S Keyboard

Amazon could get me the dark version of the keyboard in a day, while the prettier graphite version would take a week. Impatience got the better of me, and I ordered the dark one.

It came today, and of course it didn’t come with a manual, because technology companies HATE their customers. There were just some cryptic and somewhat misleading illustrations inside the box lid. I knew I should charge the keyboard, but the cable that came with it was USB-C for the keyboard end and USB-A for the other.

Apple is notoriously skimpy with ports, and my Mac Mini only has two USB-A ports. One of mine has the dongle for the iClever mouse/keyboard and the other is connected to my Canon multifunction printer/scanner. That left two USB-C ports, or I could plug the SD card dongle in a USB-C port and try using the USB-A port on that dongle.

I don’t have a lot of USB-C cables, but I remembered that some months ago I bought a cable that was USB-C on both ends to try and be forward-thinking. I found it in a drawer and used it to charge the keyboard. I hoped that the keyboard might use that cable to identify the Mac Mini and configure itself, but it appears the USB-C port on the keyboard is only for charging. <sarcasm>Because who would ever want a wired keyboard?</sarcasm>

So I followed the graphics on the keyboard box to trigger Bluetooth pairing, accessed the Bluetooth controls for the Mac Mini via the Control Panel icon at the top right (which is also where you swipe down on an iPad to see its Control Panel), and I got the keyboard connected.

Since there was little guidance on using my new and rather expensive keyboard, I then downloaded the Logi+ Options software. That at least told me what level of charge the keyboard was at.

But when it came to figuring out how to adjust the backlighting on the keyboard, I found nothing on that in the box nor in the apparent options at the top right in the Logi+ Options software. There was a link about “Smart Actions” which is some kind of macro/scripting utility, but how could I figure out the keys on the new keyboard? Well, it turned out that Logitech was using what Vincent Flanders termed Mystery Meat Navigation.

The Logi+ Options software has Mystery Meat Navigation: you have to click on the image of the keyboard to get help with it

If I hovered my cursor over the keyboard image, it jumped up a bit, indicating that clicking it would do something, but even after you stumble across how that is a link, what that link does is still mystery meat.

Why in the world didn’t the programmers think to put a text link like Keyboard Tour in their crummy program? And don’t get me started on how Logitech couldn’t be bothered to put even the most basic manual in the box with a $120 keyboard. Clicking the image of the keyboard got me a menu that included explanations of the keys. I could use F3 and F4 to adjust the backlight. I did like how there were dedicated keys for the calculator app and a configurable screen capture key; maybe this keyboard would be okay.

I then plugged the dongle that came with the keyboard into my Windows PC and managed to configure the keyboard so that I could press one key to type on my Mac and another to type on the PC.

I should have bought this version with keys you can actually see without turning on the backlight

But it didn’t take long for me to figure out that I hated the backlighting on the keyboard. Turning it off was even worse, for then the symbols on the dark version I bought were far too hard to see.

I almost never return things, but I wasn’t at all happy with my $120 purchase. I decided to box it up and return it. The experience was crummy enough that I probably won’t buy the graphite version, either.

I may just use the refund on the returned Logitech keyboard to buy another dongle with USB-A and USB-C ports. I’m aware that the USB-C ports on the Mac Mini M1 are USB 4/Thunderbolt 3 ports that can reach 40 Gb/s, so I want to ensure that any dongle I plug into one of those includes high-speed ports. The two USB-A ports on my Mac Mini are limited to 5 Gb/s.

The Missing Manual

When I was a kid, I loved reading Owner’s Manuals like this one

The fourth spend was for a manual on macOS Sonoma. I did putz around and discover that if you make the Finder active, then press Help in the menu bar, you’ll get a Tips for your Mac link. But the fumbling to find that help just increased my desire for a manual.

When I was a kid, I always read the owner’s manuals to devices our family acquired, including our automobiles, our first color television, our campers, etc.

Radio Shack included great manuals with the TRS-80 Color Computers I used in junior high and high school

When I got my first computer back in 1982, the mostly well-written and extensive manuals Radio Shack included with its Color Computers got me off to a good start, and then I turned to dedicated periodicals for more insights.

I’m almost entirely self-taught on computers, and I like manuals. I’m known for the technology manuals I’ve produced for several of the services we use in the school district, as I’m often disappointed in what even major companies provide for end users. Manuals fell out of favor in technology, which migrated to online help systems. Sometimes those are A-OK, and of course you can Google something for quick and usually-correct guidance, but there are times I really want a manual. I’ve built up a mastery of Windows over the past 40 years, but I’m still a noob on the Mac, even though I did own a Macbook Air over a decade ago.

That dilemma is why the reporter and musician David Pogue wrote dozens of Missing Manual books, and I’ve always admired his work. When I purchased the Mac Mini in January 2021, I had purchased Pogue’s Mac Unlocked, but that book was written for a machine running macOS Big Sur 11, and Pogue has retired from writing computer books. I didn’t want to be confused by references to version 11 of macOS when I am using version 14.

Despite their titles, I’ve always found Wiley’s … for Dummies series of books, of which there are over 300 these days, to be well-written references; Pogue wrote about eight of them. So I plunked down $18 for the Kindle version of macOS Sonoma for Dummies by Guy Hart-Davis, who has written over 100 computing books…assuming that isn’t a pen name for a syndicate of ghostwriters.

So here’s how deep I am into the Mac Mini at this point:

ItemDate Ordered CostRunning Total2024 Running Total
Mac Mini M112/12/2020$1,156$1,156
iClever keyboard & mouse12/12/2020$27$1,183
Mac Unlocked book1/13/2021$25$1,208
Magnet app4/21/2024$5$1,213$5
SD card dongle4/21/2024$11$1,224$16
Logitech keyboard4/21/2024$120$1,344$136
macOS Sonoma for Dummies book4/22/2024$18$1,362$154
Return Logitech keyboard4/23/2024-$120$1,242$34

The dates show how I bought the Mac Mini at the end of 2020 and started using it in early January 2021, but then stopped using it in February 2021 as the COVID pandemic was still too overwhelming. So in my mind, the final column is the most relevant in seeing how much I’m spending in lieu of simply buying a new Windows 11 desktop computer. We’ll see if that increases with another dongle soon!

In future Mac updates, I’ll get into software, interacting with other components of my Apple ecosystem, and anything of particular interest I learn from reading the Sonoma manual.

Meanwhile, Grumpy Granger says, “Happy computing!”

Posted in Mac, technology | Tagged | Leave a comment

Mac Day 1: Mac Attack

As of April 2024, the Windows 10 operating system running my home desktop computer has less than 17 months to live. In mid-October 2025, Microsoft will cut off support for Windows 10, including critical security updates.

I cannot simply install Windows 11, as my computer dates back to 2017, and Windows 11 doesn’t support its Intel Core i7-6700 central processing unit. That CPU is still no slouch, but Microsoft chose to limit how many generations of processors it would support. I could force-install Windows 11 and probably fiddle around with drivers to get it to work, but I would then be vulnerable to instabilities or having my system disabled.

That computer will be eight years old in September 2025, and the longest I’ve ever used a desktop computer was its immediate Windows predecessor, which I used for eight years from 2009 to 2017. So I’m not upset about the situation, merely disappointed.

I loved Jerry Pournelle’s Computing at Chaos Manor in the long-defunct Byte magazine

This post documents my first day of attempting to shift at home from my Windows desktop to an Apple Mac Mini. I share this in the style of the late Jerry Pournelle’s Computing at Chaos Manor column in the long-defunct Byte magazine. He would document his struggles and failures in the hopes that others could benefit. He often wrote: We do this stuff so you won’t have to.

My Operating Systems

I have owned 13 computers that ran Windows: nine desktops and four laptops, starting with a Tandy Model 2000 back in 1985. As documented in my computer history, I also owned some Apple computers. I had a 2010 Apple Macbook Air that ran OS X, I have a Mac Mini, and I have bought six iPads. I have also bought four Chromebooks, and I used a couple of 8-bit Radio Shack Color Computers back in 1982-1985. I also experienced Unix back in the 1980s on the University of Oklahoma’s engineering computers.

This is what Windows looked like when I started using it almost 40 years ago

While I could buy a new Windows 11 computer, I’m not a huge Windows fan. I despised the early versions of Windows, sticking with the command-line DOS for most things, until Windows 95 came along. Windows 95 and 98 still had many shortcomings, and it wasn’t until Windows 2000 that I had a Windows system that was so stable that I could finally start to heal from years of blue screens of death, countless slow updates, and other Windows trauma. It was in 2000 that I finally stopped calling it Windoze.

Microsoft continued to release both fine and terrible versions of Windows, including low points that I happily avoided such as Windows Me, Windows 8, and Windows Vista. But my dependence on applications specific to Windows has waned as most of my computer usage for the past seven years has been in the cloud using the Chrome web browser or on an iPad.

I have a laptop computer at work that runs Windows 11, and it is so similar to Windows 10 that I barely notice the differences when switching between it and a Windows 10 desktop. So I wouldn’t expect to get much value from a Windows 11 machine at home.

The Obvious Alternative

The approaching death of Windows 10 revived my interest in the Mac Mini I purchased at the start of 2021. I bought it during my winter break of 2020-2021 when Wendy and I were unwilling to travel due to the COVID pandemic. My experimentation with it only lasted a few weeks, since the workload and stresses of the pandemic left me with too little time and energy to tackle learning to use the Mac Mini. So the little box sat unused below my monitor for over three years, while I relied on the massive Dell XPS desktop next to it.

I’ve had a Mac Mini sitting unused on my desk for over three years

Rather than buy another Windows desktop, I could save money by just using the Mac, so long as I don’t have to purchase a slew of new software. So I listed the standalone software applications I still use at home and their availability in macOS:

ApplicationAvailable in Windows?Available for macOS?
Chrome web browser
Thumbsplus Pro graphics viewer, organizer, and editorNO
Adobe Photoshop Elements 2018
SplashID Safe password manager
iTunes
CyberLink PowerDirector 365 video editor
Epson FastFoto photo scanning

Well, well, well. While ThumbsPlus has been a mainstay for me for over 20 years, the developer stopped updating it six years ago. So switching over to my Mac was quite feasible. I was never a fan of OS X, but macOS will probably continue to support my Mac Mini for three to six more years. It would be interesting to see if I could be satisfied leaving Windows behind at home and benefit from the various integrations of my Mac with my iPhone and iPad.

I’m also quite willing to try free alternatives to Adobe Photoshop Elements 2018, SplashID Safe, and CyberLink PowerDirector. Maybe I can avoid buying their macOS versions.

Reviving the Mac Mini

So I reconnected my Mac to the second HDMI input on my ultrawide monitor, hooked up an ethernet switch to hardwire both it and my Windows machine to the internet router, charged up the remote keyboard and mouse, plugged in the power, and switched the monitor over to the Mac.

Switching from my Windows desktop computer to my three-year-old Mac Mini

The Mac fired right up, and it was running macOS Big Sur Version 11.2.2 from February 2021, as illustrated by the view of Big Sur as the desktop wallpaper. I triggered Software Update, which indicated I could download macOS Sonoma 14.4.1. I had completely missed macOS 12 and 13, called Monterey and Ventura. It indicated it would take about a half-hour to download the 14 GB update.

While it was downloading, I started the Safari web browser and tried to login to WordPress to continue writing this post, but the login screen refused to let me type in my username, even though the keyboard worked fine for typing the wordpress.com URL in the browser. I had no idea of how to fix that, so I switched to the Google Chrome web browser, which worked fine. It used the Passkey capability of my iPhone to login to my Chrome profile.

I had taken the above shots of my Windows and then Mac desktops and combined them with the Pic Collage app on my iPhone. Getting shots from my iPhone to a Windows computer has always been awkward. Sometimes I send them as email attachments, sometimes I upload them to Google Drive, and sometimes I rely on the laggy iCloud sync. With the Mac, I just triggered Airdrop on the iPhone and poof, the photos were in the Downloads folder on my Mac Mini.

Apple Annoyances

Meador’s Law of the Conservation of Happiness then kicked in. After downloading most of the update file, Software Update told me the upgrade to macOS Sonoma had failed. Typically, it provided no explanation nor options. So I restarted the upgrade, which triggered a fresh download of the 14 GB file. Welcome back to the Mac, I thought. Some things will be far easier than on Windows, while others will be exercises in stumbling frustration.

A case in point is the painful experience I had recently of switching from a Series 4 Apple Watch to a Series 9. That was a frustrating hours-long process. I placed the watches close together to facilitate the switchover, but the switchover process mysteriously got hung up with no explanation. I then had to reboot the new watch and my iPhone and fight through a number of slow and confusing errors and glitches to complete the transition.

I persevered and was able to send the Series 4 in to be recycled. I do like the Series 9 better than the Series 4 because it is a bit smaller and has an always-on display mode. So I certainly don’t regret the upgrade, but it shouldn’t have been so difficult to complete.

Thus I went into switching over to my Mac at home knowing full well that there would be glitches. But it could also be fun to learn a different way of computing, with new tools for editing and organizing my photographs, and some exciting integrations of the Mac Mini with services and apps I use on my iPhone and iPad.

Thankfully, the second try to update to macOS Sonoma 14.4.1 was successful.

The Mac Mini running Sonoma

The Basics

Keyboard Shortcuts

My Mac Mini didn’t come with an Apple keyboard or mouse; I had instead purchased a wireless Clever IC-GK03 keyboard and mouse combination back in 2021. The keyboard has keys for CTRL, FN, WIN/ALT, and ALT/CMD, as it can be switched between Mac and Windows modes.

I’m using this so-called Clever keyboard and mouse with the Mac Mini

I’m used to cutting, copying, and pasting with the CTRL-X, CTRL-C, and CTRL-V keystroke combinations in Windows. I remembered from using the Macbook Air in the early 2010s that Macs use CMD-X, CMD-C, and CMD-V and the ⌘ symbol for the command key. However, the ALT/CMD keystroke combinations didn’t work, while WIN/ALT did. So I fumbled along until I could find time to download the manual for the Clever keyboard. That confirmed the keyboard was in Windows mode, and I had to press fn-Q to switch it into Mac mode.

Snapping Windows on a Mac

I use Dell Display Manager on Windows to quickly snap windows to preconfigured areas of the ultrawide monitors at work and at home, but my Dell U3417W monitor is not compatible with their Dell Display and Peripheral Manager for Macs.

In Windows, you can drag a window past the left edge of the screen to make it snap to fill the left half of the screen, and the same for the right, but I found that didn’t work on the Mac. An online tip said to hover over the green dot in the window controls and select Tile Window to Left of Screen. Well, that sort of worked, but when I tiled Chrome to the left of the screen, it minimized the window for another application, preventing me from selecting its controls to tile it to the right. So it didn’t work as expected, instead creating a Split View like Apple has for the iPad. I don’t like Split View on the iPad, but I do use it on rare occasions. I have zero interest in using it on the Mac Mini.

Holding down the OPTION key (labeled ALT ⌥ on my Clever keyboard) while hovering over the green dot changed the options to Move Window to Left Side of Screen and so on, which thankfully worked as expected.

One of the weird things about Macs to me, as a 40-year Windows user, is how the active application’s menu bar is shown at the top left on the overall desktop, rather than having menu bars within each individual window. I’ll adjust, but it will take some time.

Screenshots

I use the Snipping Tool in Windows a lot to save selected areas of the screen, and I’m used to hitting the PrtSn or print screen key to save a full screenshot to the clipboard. The internet said that the default keystroke combination to take a full screenshot on a Mac is Shift-Command-3 and a selected-area screenshot is Shift-Command-4, and you have to add CTRL to all of those if you want to send the shots to the clipboard.

Those were far too complicated and arbitrary for me, so I fiddled with the Clever keyboard and discovered that its F12 key takes a full screenshot. If you actually want it to register F12, you use the fn-F12 keystroke combination.

I customized the keyboard shortcuts for selected-area screenshots, as I would struggle with SHIFT-CMD-4 and CTRL-SHIFT-CMD-4; I changed them to SHIFT-OPTION-S and OPTION-S
The ALT or OPTION key uses the symbol for an electrical switch

To make it easy to get selected area screenshots, I edited the keyboard shortcuts on the Mac to make ALT-S save a partial screenshot to the clipboard, and SHIFT-ALT-S to save it as a file.

A native Mac user would instead call that OPTION-S and SHIFT-OPTION-S, and Apple often labels the ALT/OPTION key with ⌥. I had to look it up to realize that is supposed to represent a single pole double throw switch in an electrical circuit.

That led me to wonder about the oddball symbol for the Command key. The internet explained:

Apple’s Command key icon, ⌘, is a “looped square” that represents the abstract concept of “command”. Apple artist Susan Kare chose the symbol after Steve Jobs decided that using the Apple logo in the menu system would be an overuse. Kare found the symbol in a reference book. She chose it because “it kind of looked like a four leaf clover”.

That symbol is used in Scandinavia to denote places of interest. I’ve decided to think of it as a castle with four corner towers to help me recognize it as “command”.

What’s Next?

In future posts, I’ll document my efforts to find suitable free Mac software for organizing and editing photos, my experience with iOS-style apps on the Mac, its integration with texting, and so forth.

I’m actually having fun exploring new ways to do familiar computing tasks. Maybe all this will help someone else who is transitioning from Windows to a Mac. But in days long past I thoroughly enjoyed reading about Jerry Pournelle’s struggles with hardware and software I never expected to use myself. So perhaps some of my gentle readers will find these posts entertaining as well. Happy computing!

Posted in Mac, technology | Tagged | Leave a comment

Standard 8 Memories

For some time I have been mining my family’s photographic archive for weekly remembrances which I post on Facebook and sometimes expand into posts on this blog. There have been times that I recalled that there was an old home movie clip that would help illustrate a post, but most of those were still trapped on old 8 mm film.

That prompted me to pull out my father’s film projector and screen and the reels of silent standard 8mm films he shot from 1961 to 1979. I had last viewed some of them 15 years earlier in Christmas 2009 when a storm left me snowbound with my parents in Oklahoma City over Winter Break.

Back then, I’d projected the films onto their old portable screen, using a digital camera to record the two films I had shot in junior high with Dad’s 1961 Kodak camera, along with a few clips from other reels he had shot. I decided I would try to digitize the remaining footage.

I tried using my father’s 1963 projector for the first time in 15 years

I set up the screen, put the projector on our ironing board, had a tripod ready for my iPhone, and threaded through the projector the last reel of film that my father had spliced together back in the 1970s. Wendy killed the lights, I flipped the switch, the motor ran, the film advanced, and the bulb glowed…for about a second. Then it blew out.

The Bolex

In August of 1963, three years before I came along, my father plunked down over $160, which is over $1,600 in 2024 dollars, at Pipkin Photo Service at Penn Square in Oklahoma City to purchase a Paillard Bolex 18-5 projector.

My father’s Bolex 18-5 projector from 1963

Paillard was a Swiss firm that made high-quality equipment: its cameras were used by famous directors like Steven Spielberg, Peter Jackson, Spike Lee, Ridley Scott, and David Lynch when they were starting out. That said, Dad’s little home movie projector began running slow in 1965, and my father paid Pipkin $40 to have it repaired at the factory in Switzerland.

1965 is also when my father’s 1961 camera and 1963 projector were rendered obsolete, since that is when higher-quality Super 8 film became available. Its exposed area was larger and that film was loaded into the camera in cartridges, rather than having to thread it into the camera.

My father, however, never upgraded. He continued to shoot standard 8 mm film until abandoning shooting movies entirely in 1979, five years after Kodak introduced Ektasound: magnetic sound recording on Super 8 film. We would occasionally watch the old silent home movies, and he had paid another $40 in 1976 to have the projector serviced.

The last use of his Kodak camera was when I shot a few films with friends in junior high circa 1980. Decades ago, the chain drive in the projector came loose, but I was able to repair that myself. This time, the repair was simply replacing the light bulb.

The Bulb

I switched to using LED bulbs around the house over a decade ago, so replacing burned-out light bulbs is now pretty rare around Meador Manor. I winced when the one in the projector went out, recalling from childhood that it was a weird-looking thing, and replacing the bulb in a 60-year-old projector was bound to be expensive.

The 1963 projector uses a Philips 13113C/04 50-watt 8-volt lamp

The projector owner’s manual (yes, my father saved everything) indicated that I needed a Philips 13113C/04 lamp, which was an optically advanced bulb with a rear ellipsoidal reflector and hemispherical front mirror to produce a narrow beam with little light loss. It has a little chimney on top so that it won’t blacken over time; the evaporated tungsten rises upward with the heat and is deposited up there.

I was surprised to find that Walmart.com had them for sale, but they listed for $132 each. Amazon had some of the bulbs for about $100, which was still too pricey for me. I was eventually able to find an eBay listing for $65, which would do.

But it took awhile for the bulb to arrive, and in the meantime, I reconsidered my approach.

The Camera

My father’s 1961 Kodak Cine Scopemeter Camera Turret f/1.9

Dad purchased his camera in December 1961, a few months after my parents were married. It was a Kodak Cine Scopemeter Turret f/1.9 which Kodak produced from 1958 to 1962. It had 6.5 mm wide-angle, 13 mm normal, and 24 mm telephoto lenses on a rotating turret, and you could shoot with no filter or use Daylight or Skylight filters for different conditions.

Dad’s camera was marketed from 1958-1962; Source

Dad’s model retailed for $100 in 1959, which would be about $1,000 in 2024 dollars. Fancier units had electric eyes to adjust the exposure, but with Dad’s you had to set an exposure index on the viewfinder box for the type of film being used and then adjust the lens opening to try and center an exposure pointer in the viewfinder.

The kind of photoflood bar my father used; Source

Dad also had a four-lamp photoflood bar which had to be used when shooting indoors because the color film was so insensitive to light. It was blindingly bright if he switched on all four bulbs, and they would get very hot.

He also had mounted on a board his editing equipment, consisting of a little illuminated viewer, two hand-cranked spindles, and a splicer. Each roll of film was 25 feet. He threaded it into the camera, exposed one half of it, and then flipped the film over and ran it back through the camera to expose the other half. The film lab would slice the film down the center and process it into a 50-foot reel of film, which would yield about 2 or 3 minutes of footage.

Dad’s editing equipment looked a lot like this; Source

Dad would splice the three-inch reels together to form seven-inch reels with 26 to 29 minutes of footage. He would scribble on a piece of scrap paper what the different scenes were, and stuck those in the can with each reel.

Digitizing old movie film

I’ve digitized a LOT of old film lately. I previously shared how I invested a thousand dollars in a couple of print and film scanners, and I’ve now scanned over 20,000 photographs at work, and have started scanning my parents’ still photographs. At work, I’m currently working my way through over 50 cans of black-and-white 35mm photographic film negatives, cutting it down to 6-frame strips that I manually run through a scanner, but that approach would never work for movie film shot at 16 or more frames per second.

The size of the exposed area of an 8mm film is quite small: less than 5 by 4 millimeters. The films I watched in elementary school and junior high in the 1970s were 16mm with over four times that resolution, and the 35mm film commonly used in cinemas before 2010 had over twenty times that resolution.

So for digitizing a movie, the cheap approach is to project it the old-fashioned way and record that with a modern camera. But I knew the limitations of the projected images from the 1960s technology I had inherited, so I decided to make yet another investment. I purchased a film scanner that would digitize the old footage frame-by-frame and output a digital video file.

The Wolverine

There is no clean way to say how many pixels you can resolve on a piece of film, but a rule of thumb is that you can scan 8mm film at 1K (1024×768), 16mm film at 2K (2048×1536), and 35mm film at 4K (4096×3072). So I invested $400 in a Wolverine MovieMaker-PRO that can scan standard and Super 8 movies at a resolution of 1440×1080.

A Wolverine MovieMaker-PRO

The market for such devices is limited, so they are updated infrequently. The device couldn’t handle SD memory cards with a capacity over 32 gigabytes. All of my SD cards were 128 GB, and Wendy’s was 256 GB. So I ordered a 32 GB card from Amazon for $10 before I thought to search my car.

Back when I was still taking photos with superzoom 35mm digital cameras, I kept an extra SD card in the car. Sure enough, I found an old 16 GB card in the car, slotted that into the scanner, threaded up a three-inch reel of film, and gave it a whirl.

The frame-by-frame scanning process is quite slow. It took over 30 minutes to scan a three-inch reel, and it can take about four hours to scan one of my father’s seven-inch reels. Below is a look at the digitizer in a YouTube review.

The Wolverine outputs MP4 videos that play back at 20 frames per second. My father’s projector runs at 18 frames per second, while the actual frame rate of his spring-wound Kodak Cine Scopemeter Camera from 1961 was supposed to be 16 frames per second.

So after copying a video off the SD card onto my Windows 10 computer, I use CyberLink PowerDirector 365 to slow down the output videos by 20%. I also crop the video image as needed and have the software perform noise reduction and video stabilization.

I was able to compare what the Wolverine produced with what I had shot the cheap way back in 2009 by capturing the output of the original projector. Here is the 2009 transfer:

Here is the edit of the 2024 scan:

The dramatic improvement in the clarity, steadiness, and color of the digitized films led me to abandon using the 1963 Bolex projector for anything except rewinding. Getting the scanned film back onto the original seven-inch film reels using the Wolverine unit would be painfully slow, while the Bolex makes short work of that. I did replace the bulb in the projector, but I never switched it on, just rewinding the films with the bulb off.

In a month I scanned and edited two three-inch reels and six seven-inch reels of film, with only two seven-inch reels and a three-inch reel remaining. So it won’t be long before everything is in my digital archive, and I can return the old film and the equipment to storage.

Some clips I have already shared online are of specialty interest. I posted eight minutes of planes landing or taking off at Love Field in Dallas in 1965:

I also shared glimpses of downtown Atlanta and Stone Mountain in 1969:

I’ve given up my copyright on those two sets of visuals so they are in the worldwide public domain, although the royalty-free music I licensed for the videos is still copyrighted. Much of the material I have digitized is only of personal interest, although the gentle readers of this blog will see a few digitized clips pop up in future posts.

Posted in history, movie, nostalgia, technology, video | 1 Comment

Cable Cut (and Restoration)

I ended a 35-year-long relationship today. Bartlesville’s cable utility provided me with television service for almost 20 years from August 1989 to January 2008, back when it was Donrey Cablevision and later CableOne. Then I cut the television service, but I kept using the coaxial cable since in December 2004 I had switched from a Digital Subscriber Line from AT&T to a cable modem for internet service. So I had a Bartlesville cable account from August 1989 to April 2024.

Bartlesville in the 1970s was where and when I first saw cable television. My parents and I would visit Frank and Alice Rice just down the street from Sooner High. Frank proudly demonstrated how they had many channels, including one with local weather and news, while in Oklahoma City at the time we only had a handful of broadcast television channels. He mentioned that there was a television studio downtown, and I eventually realized there had been one in the school district media center, part of the building where I was working 40 years later, although by my time there, the TV studio was long gone. As a kid, I thought Bartlesville was a pretty progressive place!

I was in junior high when houses in our OKC neighborhood began sprouting little microwave antennas for the Home Box Office pay television service. My parents weren’t big movie watchers, so they wouldn’t splurge for that, but in 1980, cable television finally launched in the capital city. I convinced them to get it, and that is how I got to watch MTV music television in high school on my 13″ color Zenith television in my bedroom. Yes, I know that my habit of specifying that it was a color set reveals my age; until 1973 or so, we only had black-and-white televisions in our home.

When I moved to Bartlesville in August 1989, I promptly signed up for cable TV service for my apartment at The Village. It cost $15 per month at the time, which would be equivalent to $38 in 2024. When I moved in August 1990 to a rent house, I shifted my cable service and during the four years I lived there the cost gradually increased from $16.45 to $19.95.

The cost of basic cable kept gradually increasing, even after adjusting for inflation. By 2005, it had increased 50% above the inflation rate. Meanwhile, in 2001 I stopped using a 56K modem for dialup internet access by adding a Digital Subscriber Line from AT&T to my landline telephone service. Later the cable company started offering faster internet service, so in 2005 my cable bill exploded as I added internet service on top of basic cable.

I turned in my cable modem today

In 2008 I ditched the basic cable television service, which slashed my bill by more than half. At that point, the cable modem service was 5 Mbps, or 200 times slower than what it would deliver by 2022, but at least 5 Mbps was 17 times faster than my 300 baud modem in the early 1980s.

In 2011, I was annoyed to discover that CableOne had been offering 10 Mbps service for the same price as my legacy 5 Mbps for some time without telling me. They only upgraded my service when I called about it. That predatory behavior, similar to how AT&T long mistreated its customers, left a sour taste.

However, the delivered internet speed later increased by a factor of 10 to 100 Mbps with only minor cost increases after adjusting for inflation. In late 2017 I opted to upgrade to 200 Mbps service, which was an 80% cost increase. By then, Wendy and I were married, and we were both relying on the internet for much of our entertainment.

The pricing on my internet service remained stable for four years, even as CableOne rebranded as Sparklight. But in 2022, when Bluepeak began deploying a fiber optic internet service in town, that competitive pressure led Sparklight to offer 1 Gbps service for only 2/3 of what it had been charging for 200 Mbps service.

I upgraded, but the handwriting was on the wall. As soon as Bluepeak reached our neighborhood, I had them install a fiber optic line.

That has cost $60/month for 1 Gbps service since July 2022. I kept the cable modem operating since Bluepeak had some hours-long outages early on with little or no notice. I had reckoned they would have some hiccups as they built out their network. There were a few times either Bluepeak’s fiber or Sparklight’s coaxial cable would stop working, and I simply switched which one was feeding into the Eero mesh system that came with my Bluepeak service.

In recent months Bluepeak has been sending me a text each time service was interrupted and later restored, and we had relied on it exclusively for several months with no major issues. So I finally felt comfortable terminating Sparklight’s 1 Gbps cable modem service, which was costing me $94 per month.

Overall, I spent over $23,000 on cable services over the past 35 years, or almost $34,000 in 2024 dollars after adjusting for inflation. That averages out to $81 per month in 2024 dollars. I’ll enjoy seeing what I pay for home internet service drop from $154/month to $60/month.

Then again, we’re also paying for two iPhones and an Apple Watch, which each have cellular service…but how my phone services evolved is thankfully beyond the scope of this post!


LATER UPDATES

Posted in technology | 1 Comment